How to Properly Calibrate Your Arduino pH Sensor
pH sensors are very useful in DIY electronics and Arduino projects. They can be used for hydroponics, aquariums, brewing, soil monitoring, or any project that requires pH measurement.
But there’s a problem: most online tutorials don’t calibrate the sensor correctly. They usually demonstrate a single-point calibration — just shifting the measurement up or down in code until the reading looks right at pH 7. While this works for rough readings, it will not give reliable results across the full pH scale.
Why Single-Point Calibration Fails
The assumption behind single-point calibration is that the probe follows a perfect slope of −59.16 mV per pH unit at 25 °C (which scales to about −5.7 V/pH in Arduino code). In practice:
- Probes drift over time.
- Both the slope and the offset can shift due to age, temperature, or contamination.
- A single calibration value cannot correct both errors at once.
This is why your readings may look fine at calibrated pH but be far off at pH 4 or pH 10.
Arduino pH Probe Code
Upload this code into your arduino.
// pH Sensor with 2-point calibration
// Connect Po -> A0, V+ -> 5V, G -> GND

int buffer_arr[10], temp;
unsigned long int avgval;

// --- Replace these with your measured voltages ---
float V7 = 2.50;   // voltage when probe is in pH 7 buffer
float V4 = 3.00;   // voltage when probe is in pH 4 buffer
// Or instead of V4, you can use V10 (alkaline) if that’s closer to your application

float slope, offset;

void setup() {
  Serial.begin(9600);
  Serial.println("pH Sensor Test with 2-point calibration");

  // Calculate slope and offset from calibration data
  slope  = (7.0 - 4.0) / (V7 - V4);
  offset = 7.0 - slope * V7;

  Serial.print("Calibration slope = ");
  Serial.println(slope, 4);
  Serial.print("Calibration offset = ");
  Serial.println(offset, 4);
}

void loop() {
  // Take 10 readings and sort them
  for (int i = 0; i < 10; i++) {
    buffer_arr[i] = analogRead(A0);
    delay(30);
  }
  for (int i = 0; i < 9; i++) {
    for (int j = i + 1; j < 10; j++) {
      if (buffer_arr[i] > buffer_arr[j]) {
        temp = buffer_arr[i];
        buffer_arr[i] = buffer_arr[j];
        buffer_arr[j] = temp;
      }
    }
  }

  // Average middle 6 values
  avgval = 0;
  for (int i = 2; i < 8; i++) {
    avgval += buffer_arr[i];
  }
  float volt = (float)avgval * 5.0 / 1024 / 6;

  // Apply calibration
  float pH = slope * volt + offset;

  // Print result
  Serial.print("Voltage: ");
  Serial.print(volt, 3);
  Serial.print(" V  |  pH: ");
  Serial.println(pH, 2);

  delay(1000);
}
The Proper Way to Calibrate: Two-Point Calibration
To calibrate properly, you need both a slope and an offset. The relationship between probe voltage (V) and pH is:

To determine slope and offset, you use two buffer solutions.
- Measure voltage in pH 7 buffer → call this
V7. - Measure voltage in pH 4 buffer (or pH 10, depending on your range) → call this
V4.
Calculate slope:

Calculate offset:

With this formula, your calibration is locked to your actual probe.
Step-by-Step Calibration Guide
1️⃣ Prepare the calibration buffers
- Always use distilled or deionized water, not tap water.
- Dissolve buffer powders in clean containers according to package instructions.
- Common buffers: pH 7 (neutral) and pH 4 (acidic). Use pH 10 instead of 4 if your project is more alkaline.
- Let the solutions reach room temperature (20–25 °C).
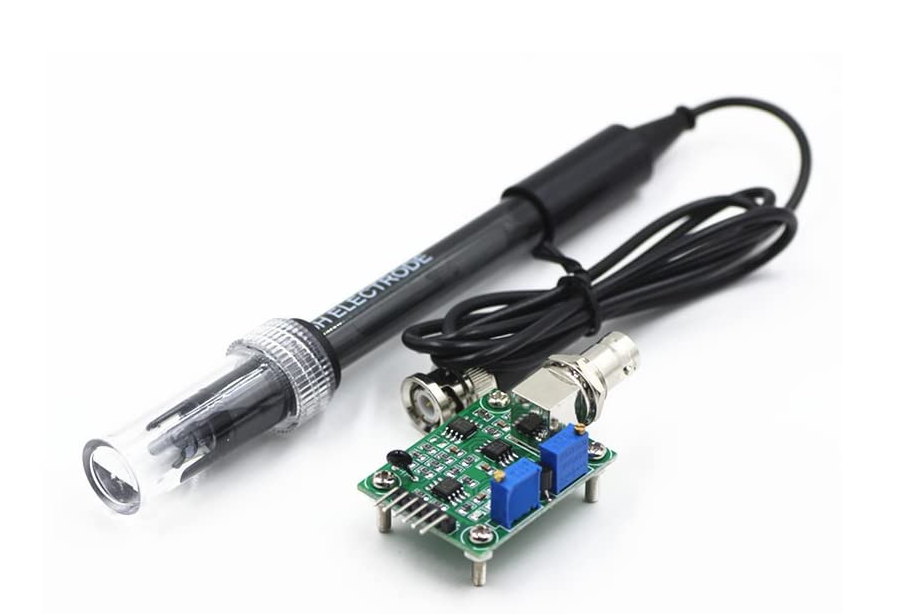
2️⃣ Connect the sensor
- V+ → 5V
- G → GND
- Po → A0 (Arduino analog pin)
- Do and To are optional and can be ignored for basic pH measurement.
3️⃣ Upload the 2-Point Calibration Sketch
Load the updated Arduino sketch that includes placeholders for V7 and V4. These will be replaced with your measured voltages.
4️⃣ Measure the voltage at pH 7
- Rinse the probe with distilled water.
- Place it in pH 7 buffer.
- Open Serial Monitor (9600 baud).
- Wait 30–60 seconds until the voltage stabilizes.
- Note the voltage (
volt) displayed. - Replace
V7in the code with this measured value.
5️⃣ Measure the voltage at pH 4 (or 10)
- Rinse the probe with distilled water.
- Place it in pH 4 buffer (or pH 10 if working in alkaline range).
- Wait for stabilization.
- Note the voltage shown.
- Replace
V4in the code with this measured value.
6️⃣ Re-upload the sketch
Change the values in code for V7 and V4 with the values you measured from the calibration and reupload to arduino.
The code will now calculate slope and offset automatically, since it can calculate from these variables:

The Serial Monitor will print your calibration slope and offset values for confirmation.
7️⃣ Test the calibration
- Rinse the probe again with distilled water.
- Place it back into pH 7 buffer. The reading should be ~7.00.
- Check pH 4 (or 10) buffer — the reading should be close to 4.00 (or 10.00).
- If you also have a third buffer (pH 10 if you calibrated with 4, or vice versa), test it as well.
⚡ Tips for Accurate Calibration
- Always rinse the probe with distilled water between buffers.
- Stir gently to remove bubbles trapped on the probe tip.
- Give the probe 30–60 seconds to stabilize in each buffer.
- Perform calibration at room temperature (pH is temperature-dependent).
- Don’t reuse buffer solutions after dipping the probe; contamination will throw off the pH.
Conclusion
Most Arduino pH sensor tutorials only use a single calibration value, which is fine for approximate measurements but not reliable across the pH scale.
For real accuracy, always perform two-point calibration with at least pH 7 and either pH 4 or pH 10 buffers. By calculating both slope and offset, you can trust your sensor’s readings across the range relevant to your project.
If you need high accuracy over the full 0–14 pH scale, you can also perform three-point calibration (pH 4, 7, and 10).

EEG Patterns During Meditation and Mental Activity — What I Discovered in My Own Brain

Exploring the influence of Schumann resonance and electromagnetic fields on bioelectricity and human health